
# Getting Started With Unit Testing With Bespoken
It's easy to unit-test your Alexa skills and Google actions with Bespoken.
Here's a sample from the tests being run (for Alexa):
---
configuration:
  locale: en-US

---
- test: "Sequence 01. Test scenario: launch request, no further interaction."
- LaunchRequest: # LaunchRequest is not an utterance but a request type
  - response.outputSpeech.ssml: "Here's your fact"
  - response.card.type: "Simple"
  - response.card.title: "Space Facts"
  - response.card.content: "/.*/" # Regular expression indicating any text will match

---
- test: "Sequence 02. Test scenario: GetNewFactIntent with an utterance"
- "give me a fact":
  - response.outputSpeech.ssml: "/here's your fact.*/i" # i flag means case insensitive
  - response.card.type: "Simple"
  - response.card.title: "Space Facts"
  - response.card.content: "*"

---
- test: "Sequence 03. Test scenario: AMAZON.HelpIntent. Ask for help and exit."
- LaunchRequest: # Empty expected part means we are not testing the response
- help: # This is what we want to test in this sequence
  - response.outputSpeech.ssml: "What can I help you with?"
  - response.card: undefined
  - response.reprompt.outputSpeech.ssml: "What can I help you with?"
- exit:
  - response.outputSpeech: undefined
# Setup
To get started, you need to install Bespoken Tools.
If you haven't already, follow these steps:
Install NPM
Instructions here (opens new window) if you have not already installed npm.
Open A Command Prompt
For Mac, run Applications -> Terminal
For Windows, select Run -> cmd
Install Bespoken Tools
Once on the command-line, type:
npm install bespoken-tools -g
If that fails with a permission warning, you can simply run:
sudo npm install bespoken-tools -g
To confirm that it is installed, type: bst on the command-prompt. You should see something like this:
jpk-mbp:skill-testing-ml jpk$ bst
BST: v2.0.0  Node: v8.11.1


  Usage: bst [options] [command]
  **(Output truncated)**
# Run Your Tests
If you are starting with one of the sample projects below, just go ahead and enter:
bst test
That's all there is to it!
# Understanding The Output
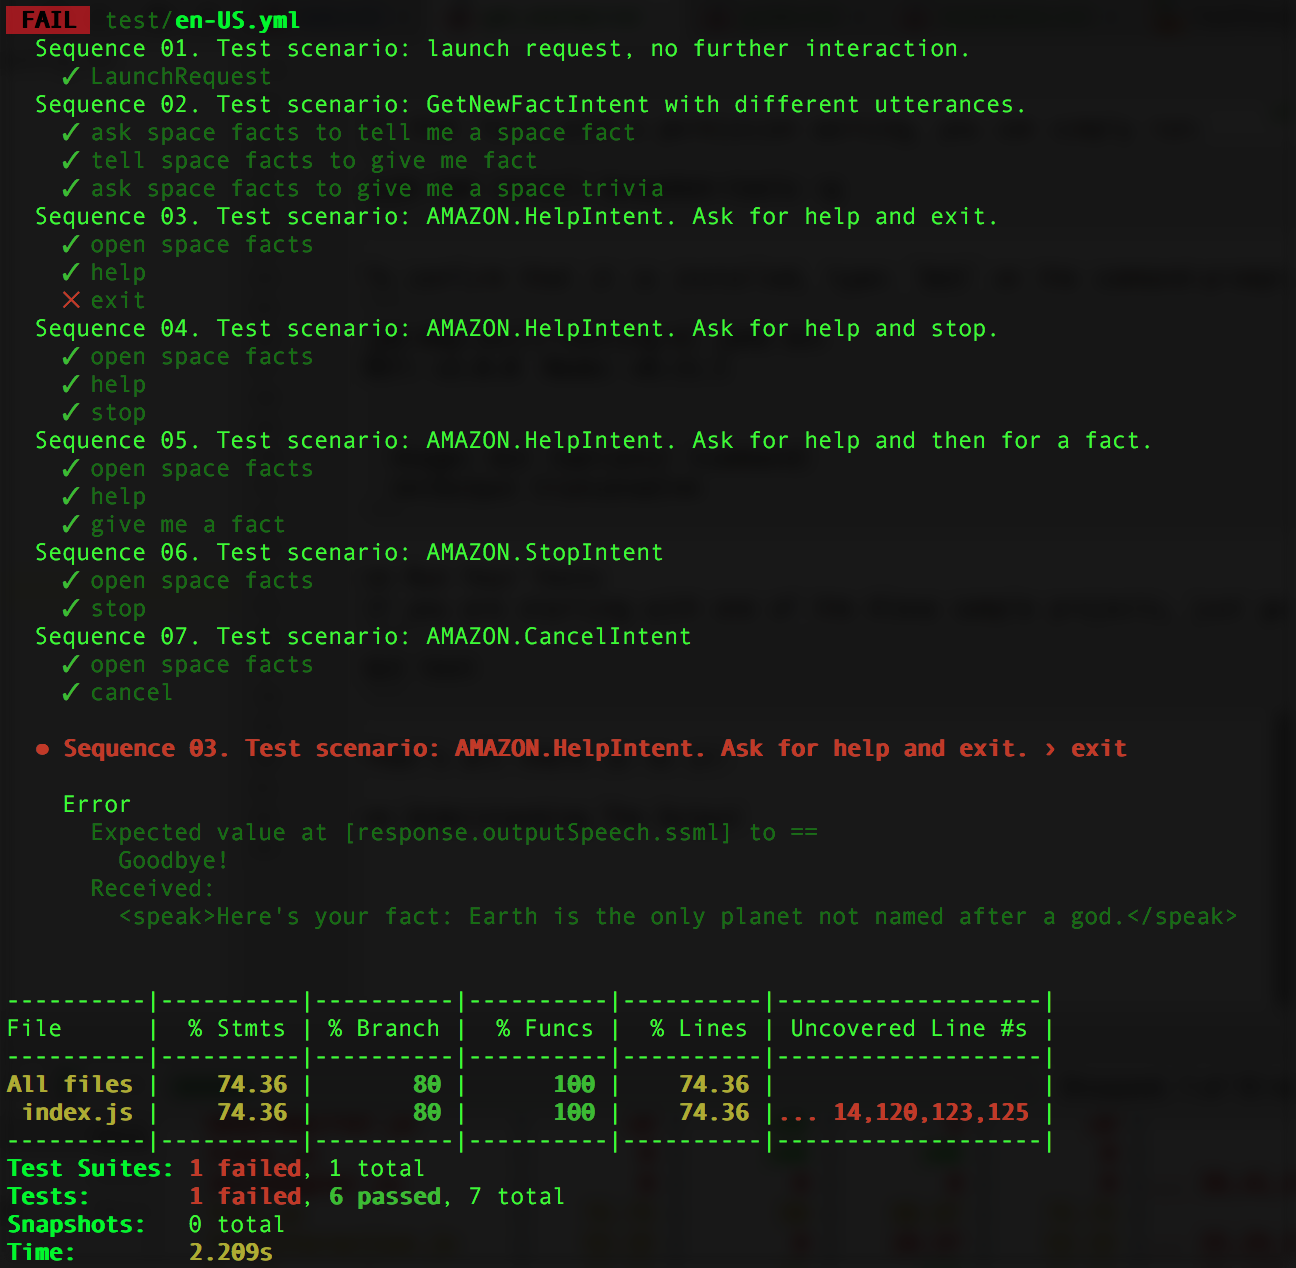
The top of the output is the result of each test. Underneath each test is the sequence of interactions.
If any failed, they are marked with an X.
Below this list of tests, we see detailed output for any test that failed:

This tells the exact interaction that failed, as well as why it failed. Based on this, we can either fix our test or fix the code.
The summary at the bottom tells us about the success of the tests, as well as basic code coverage info.
To see more detailed code coverage info, we can go to coverage/lcov-report/index.html.
The coverage directory will be located in the same directory where your testing.json file is located.
This provides detailed information about the code coverage for our tests.
# Further Reading and Examples
# Alexa
To learn in detail how to add more tests and other advanced topics, read our In-depth guide for Alexa. Also, learn about other common use-cases here, such as:
- State Management With Dynamo
- Testing The Address API
- Working With Dialogs
And take a look at the following skills with test examples already configured:
- Get Facts Github (opens new window) Travis (opens new window) Codecov (opens new window)
- Address API Example Github (opens new window) Travis (opens new window) Codecov (opens new window)
- High Low Game Github (opens new window) Travis (opens new window) Codecov (opens new window)
- AudioPlayer Example Github (opens new window) Travis (opens new window) Codecov (opens new window)
- Dialog Manager Example Github (opens new window)
- College Finder (Unit + E2E) Github (opens new window) Travis (opens new window)
To learn in detail how to add more tests and other advanced topics, read our In-depth guide for Google.
And take a look at the following skills with test examples already configured:
- Guess the Price Game Github (opens new window)