# Getting Started With The Bespoken CLI
# What is the Bespoken CLI
The Bespoken CLI are a set of tools created by us to let you develop faster and better. Do not slow-down for:
- Time-consuming server deployments
- Over-complicated and highly manual testing routines
# Installation
To install the Bespoken command line tool (bst) do:
$ npm install @bespoken-sdk/cli -g
Note: If you are on MacOS and the command fails, it is probably because you need to run it with sudo, like this:
$ sudo npm install @bespoken-sdk/cli -g
Verify the installation by typing:
$ bst
Haven't used npm before? We have you covered: How To Install NPM (opens new window)
You will then be able to use our commands, as described below.
You can also use:
- --version, -v - Indicates the current BST and Node versions
- --help, -h - Shows usage information
# Updating
To update bst:
$ pnpm update @bespoken-sdk/cli -g
# Guide to Bespoken CLI Commands
# Command - Init
# Overview
The init command helps you creating all the files and folders you need to start unit or end to end testing your Conversational AI applications.
# Usage
To run the init command, simply open a terminal and, in the root folder of your project, type:
$ bst init
The command will ask you for the following data:
- Test type: unit or e2e
- Name of the Conversational AI Experience you are testing
- Type of Conversational AI Experience: Alexa, Google or IVR
- Test locales: en-US is the default. You can add more via a comma-separated list - for example:
en-US, de-DE, es-ES - For unit testing only:
- Path of your handler file: default is index.js
- Path of your dialogflow directory (only for Google actions)
- For end to end testing only:
- Virtual device token
- For IVR systems only:
- Phone number to call to
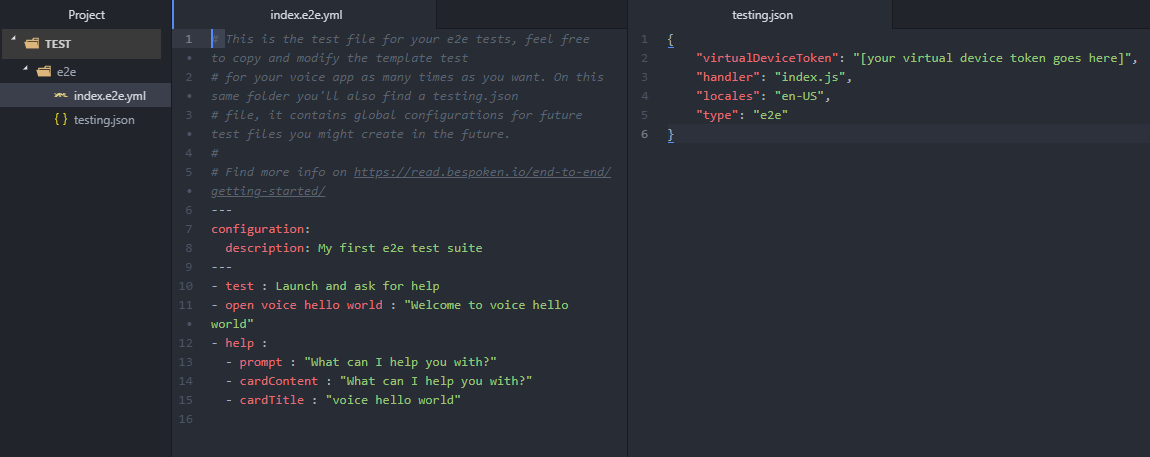
Here's a preview:
After that, the command will create a "test" directory with all the needed files and folders.
You can execute your tests by typing bst test on the same command line.
# Command - Test
# Overview
The test command runs local YAML tests files.
# Usage
To run the test command, simply open a terminal and, in the root folder of your project, type:
$ bst test <TEST_PATTERN>
The TEST_PATTERN uses the MicroMatch package (opens new window) under the covers, which supports glob syntax, such as:
- test/*.js # Runs all files in subfolders named test with files matching
*.js - test # Runs all files in subfolders named test
- **/*.test.js # Runs all files in any sub-folder that match
*.test.js
Test results are automatically output to the console, as well as written as an HTML report in the folder ./test_output/index.inline.html.
Test parameters and configuration are taken by default from the file ./testing.json in the current working directory. For more information on the various test parameters, read here (opens new window).
# Command - Test Suite
# Overview
The test-suite command provides sub-commands to manage and run test suites defined in the Bespoken Dashboard.
The sub-commands are:
bst test-suite create- creates or updates the named test suite in the Bespoken Dashbaordbst test-suite run- runs the named test suite in the Bespoken Dashboard
Each command is described in detail below.
# Test Suite Create
Usage
To execute the test-suite create create command, simply open a terminal and, in the root folder of your project, type:
$ bst test-suite create <TEST_SUITE_NAME> <CONFIGURATION_PATH> <TEST_SUITE_YAML_PATH>
If the named test suite already exists, it will be overwritten by running this.
The CONFIGURATION_FILE should be the path from the current directory a valid testing.json configuration file.
The TEST_SUITE_YAML_PATH should be valid testing YAML script.
For more information on the structure of the configuration file and test scripts, read here (opens new window).
# Test Suite Run
Usage
To execute the test-suite run command, simply open a terminal and, in the root folder of your project, type:
$ bst test-suite run <TEST_SUITE_NAME> [KEY1=VALUE1] [KEY2=VALUE2] [KEY3=VALUE3]
This will run the named test suite within the Dashboard, passing the optional variables for test execution.
When the test is completed, a link to the results in the Dashboard will be provided in the console. The test run will be stored with the Dashboard, and will always be available to review there.