# FAQ for Unit-Testing
Here you can find common questions on regards unit testing for voice apps.
# Getting started
# What is unit testing and why do I need it?
In traditional computer programming, unit testing is a software testing method by which individual units of source code are tested to determine whether they are fit for use. Our approach to unit testing is aligned with the new style of unit tests; which is to focus on the code as a whole as opposed to small parts of it.
You need to do unit testing to be sure the voice app code is working correctly. To that end, you can write unit tests scripts to verify each intent and each major piece of functionality.
For more information about testing voice apps, please read here (opens new window).
# How do I unit-test with Bespoken?
We have created a component called Virtual Alexa (opens new window), which emulates the Alexa Voice Service and creates JSON objects that are sent to your skill. This library can be used to write unit tests programmatically using popular testing framework (such as Mocha and Jest).
But we also offer an easier way to perform unit testing by writing simple test scripts based on YAML syntax and running them with our CLI. These scripts are executed locally using the Virtual Alexa simulator. Each test suite execution displays the code coverage you reach based on your test scripts. To get started with Unit Test Scripts please read here (opens new window).
# What is code coverage?
In computer science, test coverage is a measure used to describe the degree to which the source code of a program is executed when a particular test suite runs. A program with high test coverage, measured as a percentage, has had more of its source code executed during testing, which suggests it has a lower chance of containing undetected software bugs compared to a program with low test coverage.
Bespoken Unit-Testing comes with Code Coverage out of the box, you don't need to do anything to enable it, just check the results after executing your test scripts. Here you have a sample output. "% Lines" indicate the total number of lines that have been covered by the test script we are running.

The code coverage by default is written to ./test_output/coverage/lcov-report/index.html relative to where your tests are run (by default, should be the root of your project).
# How I get my results as an HTML report?
The results of your tests are automatically formatted into a nice HTML report, courtesy of jest-stare.
It is viewable under ./test_output/results/index.html.
It provides a nice summary of the results of your tests, with charts. You can also drill down into the detailed test results.
To read more about jest-stare, click here (opens new window).
# How do I learn more?
Take a look here (opens new window) for more info on unit-testing. If you need assistance reach us on any of these channels:
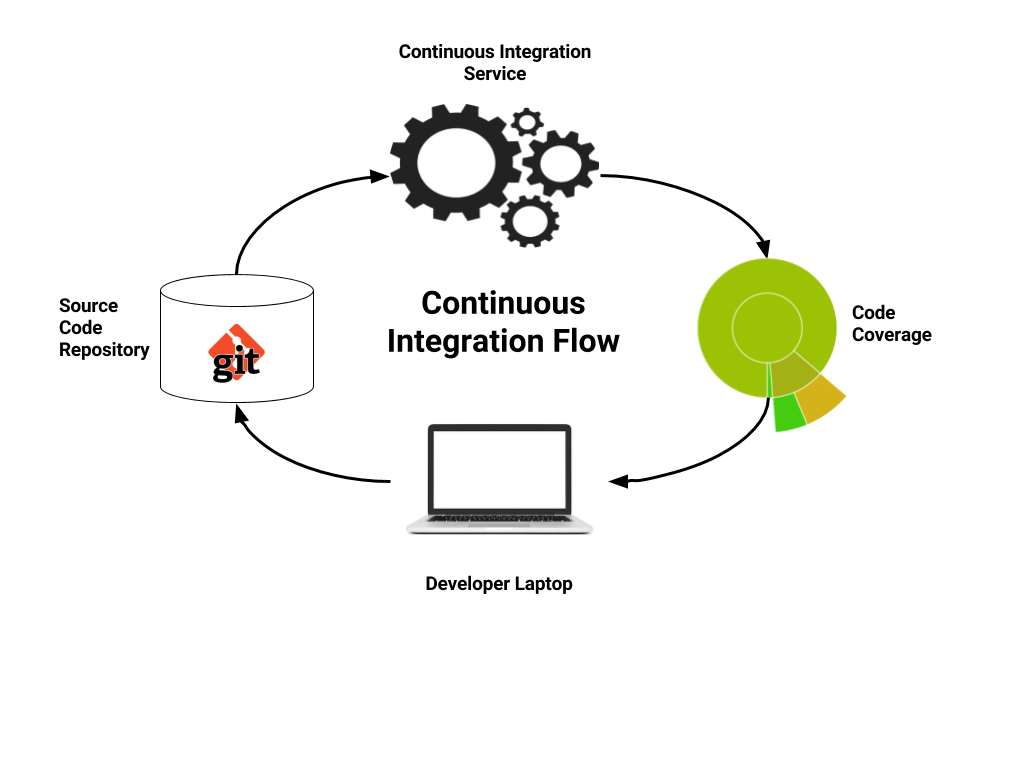
# What are continuous integration (CI) and automated unit testing?
Continuous Integration (CI) is the process of automating the build and testing of code every time a team member commits changes to version control ... Sam Guckenheimer (Microsoft)
It works by tying a CI platform into the source code repository and automatically running unit tests whenever new updates to the code are made on the repository. There are many popular CI platforms, such as Travis CI, CircleCI, and Jenkins, so you can take your pick. They are typically easy to setup, and will “intuit” things about the project (such as what type of programming language it uses and how to run tests within it). This auto-configuration makes them even easier to work with.
 The continuous integration service is responsible for bringing our source code, unit tests and code coverage together, including alerting the developer when there are issues. These issues can manifest with either tests failing or new code that is insufficiently tested. And once configured, there are a ton of helpful tools out there to perform ongoing checks to ensure code quality.
Check this sample project (opens new window), it contains a .travis.yml file which is the configuration element to enable CI using Travis platform.
# Can I use Bespoken to unit test Google Actions?
Yes, certainly. Read our guide about unit-testing Google Actions here (opens new window).
# Can I unit-test skills written in programming languages other than Javascript?
Yes, you can. It does require having a server running locally on your laptop that our library can call, but otherwise it will "just work".
Before the test is run, start the server to receive payloads. It will be listening on something like: http://localhost:9000.
Set that URL in the skillURL configuration element in the testing.json file. This should be set instead of the handler element - the handler only works with Javascript lambdas/functions.
After tests are run, shut the server down - we recommend doing this as part of a regular process. It can be added to one of our filters, for example - read about filters here (opens new window).
Finally, if you have request signature checking or timestamp filtering being performed on the requests, you will need to disable this.
# I have network issues while using the tools, why is that?
This might happen if your network admin is blocking ports. The bst proxy tool uses a tunnel in the port 80. In case your network admin has defined blocking rules for domains, you won't be able to use Bespoken. To make it work, you have to request your network admin to unblock next domains:
- https://api.bespoken.link and (
*.bespoken.linkif you want to use the proxy command) - https://proxy.bespoken.tools
- https://source-api.bespoken.tools
- https://virtual-device.bespoken.io (if you are going to execute functional tests)
# I get errors when using bespoken unit testing against my Alexa production server
In order to certify your Alexa Skill, all requests have to come from Amazon. Since we generate mock requests to do the unit testing, these don't go through the Amazon validation process and will be rejected. If you want to test against a production skill please use our functional tests.
# I want to do something that is not supported with the tools like adding a delay between responses or stopping after a test has failed
Use the filter functionalities to add any kind of behavior during tests (read here (opens new window) for more information). Please, also refer to the API documentation (opens new window) to understand how to use the test property. For instance, the test property can be used to know if the test has passed/failed, or if the test should be skipped.
# Working with test scripts
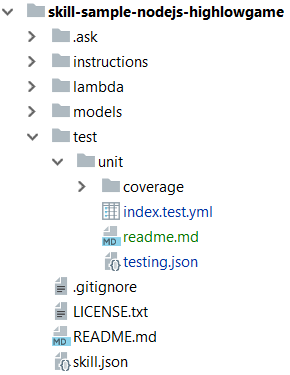
# How should I organize my test files?
This is our recommendation:
- Create a
testfolder under the root of your voice app project. This folder will contain your test script files. - To store your unit test script files and the
testing.jsonconfiguration file create aunitfolder under yourtestdirectory.
Here's an example:

# Where should I indicate the locale for the script?
That depends, if you write all your test scripts for one locale only (en-US for example) it's better to define it in your testing.json configuration file:
{
  "handler": "../../lambda/custom/index.js",
  "locale": "en-US",
  "trace": true,
  "jest": {
    "silent": false,
    "coveragePathIgnorePatterns": []
  }
}
If your skill supports multiple locales you have 2 options:
- Use our localization feature to write one single test script and then add the reponses of each locale in the localization files. Check this project sample (opens new window) to get started.
- Create a different test script per each locale and define the locale in the configuration section of each test script file:
---
configuration:
  locale: en-US
  dynamo: mock
  userId: 000000
# How do I invoke an intent with slots?
If you want to execute an intent with slots in just one line, use our succinct syntax. For example:
---
- test: The size and pet slot values are provided on open
- PetMatchIntent size=small pet=dog:
  - prompt:
    - Would you prefer a dog to hang out with kids or to protect you?
    - Are you looking for more of a family dog or a guard dog?
- AMAZON.StopIntent: Bye
As you can see we add the slots and their values after the intent name in the left part of the YAML sentence. Check the full code of this project and test script here (opens new window).
# Which shorthand properties can I use to make my script more readable?
To improve the readibility of your scripts you can use these values in your unit test script file:
- prompt: Equivalent for
response.outputSpeech.ssml - reprompt: Equivalent to
response.reprompt.outputSpeech.ssml - cardTitle: Equivalent to
response.card.title - cardContent: Equivalent to
response.card.content - cardImageURL: Equivalent to
response.card.image.largeImageUrl - sessionEnded: Equivalent to
response.shouldEndSession
# My skill use the Device Address API/DynamoDB how can I do unit testing without hitting the cloud?
We have created mockups for that, there is no need for you to do any local setup to use them. Read here (opens new window) to know how to use them.
# Can I use utterances instead of intent names in my scripts?
Yes, you can, but as we are emulating Alexa turning utterances into intents might not be 100% accurate in some cases. To avoid this we recommend setting the exact intent and slot values with the intent and slot properties. For example, you can turn this:
---
- test: The size and pet slot values are provided on open
- tell pet match i want a small dog:
  - prompt:
    - Would you prefer a dog to hang out with kids or to protect you?
    - Are you looking for more of a family dog or a guard dog?
- stop: Bye
Into this:
---
- test: The size and pet slot values are provided on open
- PetMatchIntent size=small pet=dog:
  - prompt:
    - Would you prefer a dog to hang out with kids or to protect you?
    - Are you looking for more of a family dog or a guard dog?
- AMAZON.StopIntent: Bye
Check the full code of this project and test script here (opens new window).
# How do I use the debugger with Bespoken unit-tests and Visual Studio?
Read about this in-depth in our blog post here (opens new window). Here is the short summary:
Open the launch.json configuration in Visual Studio: Debug -> Open Configurations.
Add an element like this:
"configurations": [
  {
      "type": "node",
      "request": "launch",
      "autoAttachChildProcesses": true,
      "name": "UnitTest",
      "program": "<PATH_TO_BESPOKEN_TOOLS_INSTALL>/bin/bst-test.js",
      "args": [],
  }
]
Then select Debug -> Start Debugging. You also will likely need to set collectCoverage to false as explained in the next FAQ.
Happy debugging!
# Breakpoints are not working for me with unit-tests in Visual Studio
If you have configured debugging in Visual Studio and breakpoints are not working, set collectCoverage on the testing.json under the jest element to false.
It should look like this:
{
  "jest": {
    "collectCoverage": false,
    ...
  }
}
